DIY Sensory Body Sock: A Sensory Support Tool
Affiliate and Referral links are used below to promote products I love and recommend. I receive a commission on any purchases made through these links. Please see my disclosure policy for more details. As an Amazon Associate, I earn from qualifying purchases.
I am thrilled to bring a guest post to you from Kerry at The DIY Therapist. Kerry is going to share how to make a DIY sensory body sock. I love using sensory body socks for calming and regulation. My daughter used to live in hers until she outgrew it.
Welcome Kerry!
Hi everyone! I’m so thrilled to be hanging out here today. At Growing Hands On Kids, Heather has created a warm and welcoming space for all things pediatric occupational therapy, and I am honored to share a little something for you all.
I’m Kerry, a pediatric occupational therapist and blogger at The DIY Therapist, and I am passionate about do-it-yourself OT projects that support individuals across the lifespan. Today, I am excited to be sharing with you how to make your sensory body sock, a tool that helps kids regulate their sensory system through the use of deep pressure.
What Is A Sensory Body Sock?
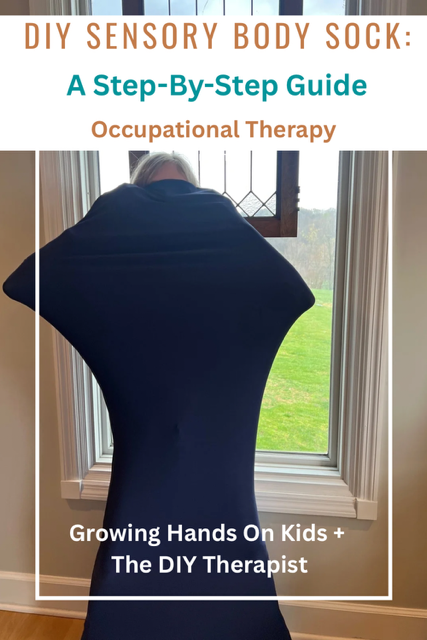
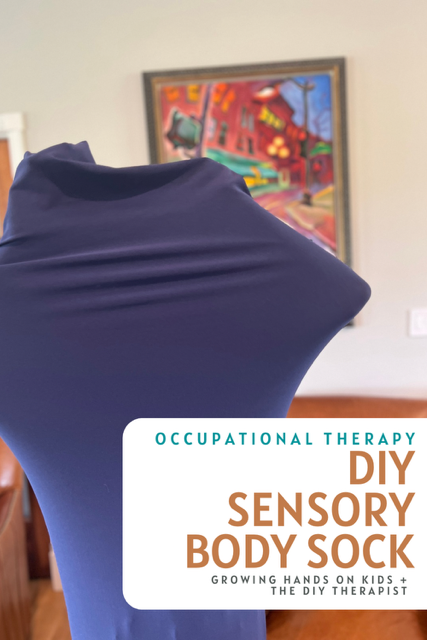
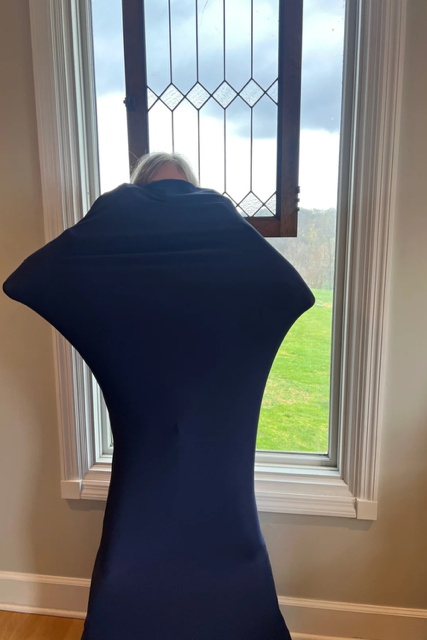
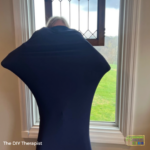
A sensory body sock, also known as a sensory sock or body sock, is a type of sensory aid often used in occupational therapy by children (and adults, too!) to provide proprioceptive, vestibular, and tactile sensory input. It is essentially a stretchy fabric sack that a child can climb into and place over their shoulders that helps regulate the sensory system.
What Is The Purpose Of A Sensory Body Sock?
This handy, portable sensory aid provides the user with calming and organizing benefits due to the resistance of the spandex material. Within this contained space, the sock encourages exploration of movement and spatial relationships, further stimulating the vestibular, tactile, and proprioceptive systems. Any movement within the sock, especially changes in head position, directly stimulates the vestibular system.
Who Might Benefit From Using a Sensory Body Sock
Children and adults who might benefit from using a sensory body sock include:
- Sensory processing differences
- Overstimulation or understimulation
- Sensory seekers
- Heightened activity level
- Attention-Deficit Hyperactivity Disorder (ADHD) or Autism diagnosis
- Difficulty sitting still, such as while doing homework
- Difficulties with inattention and focus
- Heightened anxiety levels
- Heightened impulsivity
What Are The Benefits of A Sensory Body Sock?
Sensory body socks may help improve the following:
- Help organize and regulate the sensory system
- Help get sensory needs met
- Reduce anxiety and fidgeting
- Improve attention and focus
- Help reduce activity level
- Help develop spatial awareness
- Provide compression through deep pressure
- Feel more grounded
- Improve body awareness
- Improve emotional regulation
- Encourage imaginative play
Other DIY Sensory Support Aids For Home and School
- Weighted lap pad
- Built-up foam pencil grip
- Weighted stuffed animal
- Sensory kick bands for school chairs
- Weighted pencil
Safety Using The Body Sock
When using the sensory sock at home, school, or at a pediatric therapy center, consider designating a defined space. This will help avoid bumping into objects and prevent falls. Such spaces can be a large rug, mat, clutter-free playroom, or even the bed for when lying down. Above all, avoid using the sensory body sock on slick floors such as hardwood floors or linoleum. The head should remain outside the body sock unless lying down on a bed or other stable surface to prevent falls. Adult supervision is required.
Games To Play
Looking for games to play using the sensory body sock? Check out these fun and engaging games by GHOK: 8 Fun Ways To Use A Sensory Body Sock.
Special Instructions for Making The Sensory Body Sock
Fabric
For this project, the fabric should include a mixture of materials, including spandex as well as either nylon or polyester in your fabric. The fabric can be made up of a range of 80-93% nylon or polyester and 7%-20% spandex. This type of fabric can be found at Joann Fabric, Hobby Lobby (watch for sales!), or your local fabric store. The Lycra brand fabric is also a good choice and can be ordered online.
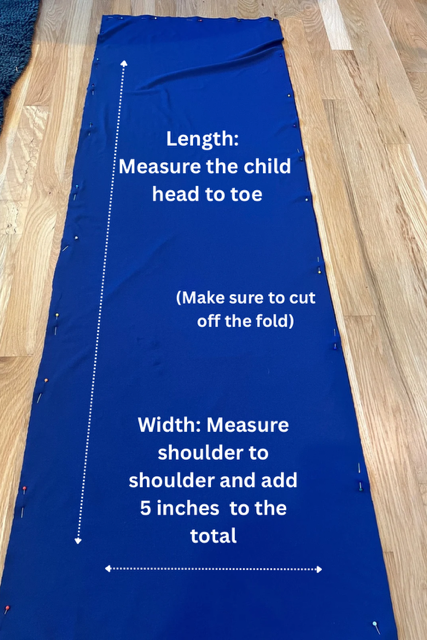
The fabric I am using is a mixture of both spandex and polyester. Measure the child from head to toe for length. For the width, measure the child from shoulder to shoulder and add 5 inches.
Test the Fabric Before Purchase
Before purchasing, test the elasticity of the fabric by stretching it in multiple directions. Does it bounce back like it should or leave a wave in the fabric (which you do not want)? How does the fabric feel? Is it thin? Or too thick? Does the actual texture of the fabric feel nice? The fabric I decided on is a medium-heavy weight, has resistance, but can be easily stretched as well.
How Should The Body Sock Fit?
The snug fit of the body sock provides the user with the calming effects of deep pressure. It should not be loose, but instead provide the child a snug bear hug. Therefore, the sock should not cause any pressure points or make the child feel uncomfortable due to the amount of pressure.
Thread
100% polyester thread is needed for this project. Polyester thread is known for its high strength and ability to stretch.
I used Gutermann’s 100% polyester thread for this project. Standard cotton thread will not work.
Sewing Machine Needle
Either use a ballpoint or stretch needles, which will accommodate this type of stretchy fabric.
Sewing Machine Stitch
Use a zigzag stitch for this project; the stretch stitch may also work. For the zigzag stitch, I used the pre-programmed settings on my sewing machine. The pre-programmed settings are as follows:
- Length 1.5
- Width 3.0
How To Make A Sensory Body Sock
Check out this helpful resource that can help guide you through sewing with stretchy fabrics.
Materials
- Lycra brand fabric or a mixture of spandex along with nylon or polyester, see section above regarding the fabric needed, approximately 2 yards, depending on the height of the user.
- 100% polyester thread
- Stretch or ballpoint sewing machine needle
- Sewing machine with a zigzag stitch
- Scissors
- Rotary cutter and mat (or scissors)
- Measuring tape
- Straight pins
Instructions
Measure
- First, measure the child from head to toe. Fold the fabric in half lengthwise for the front and back of the sock. Cut the length of your fabric based on the head-to-toe measurement, either using scissors or a rotary cutter and mat.
- Next, measure the width of the child from shoulder to shoulder and add 5 inches to the width. Cut the width of the fabric to size, making sure to cut and discard the fold (or keep for another project).
Test Your Settings and Material Before Starting
- Before starting the next step, begin by sewing two scrap pieces of the spandex material together. To do this, use a ballpoint or stretch needle, 100% polyester thread, and the zigzag stitch (my stitch length is 1.5; stitch width 3.0). Once done, stretch the sewn scrap fabric pieces apart in multiple directions, and inspect. Make adjustments and test again if needed, and when ready, begin the project.
Begin The Body Sock
- Next, determine which side will be on the outside versus the inside of the fabric. With the right sides together, pin in place.
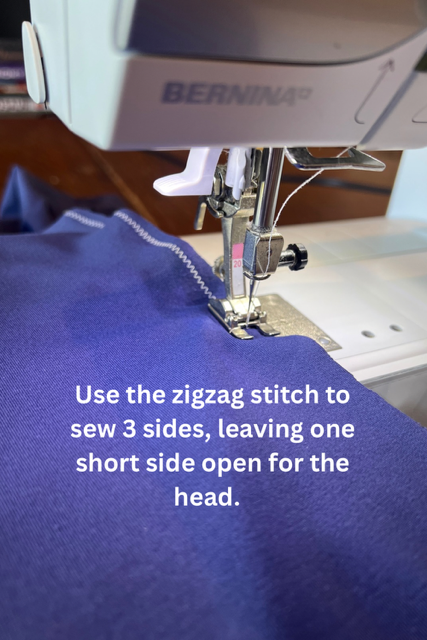
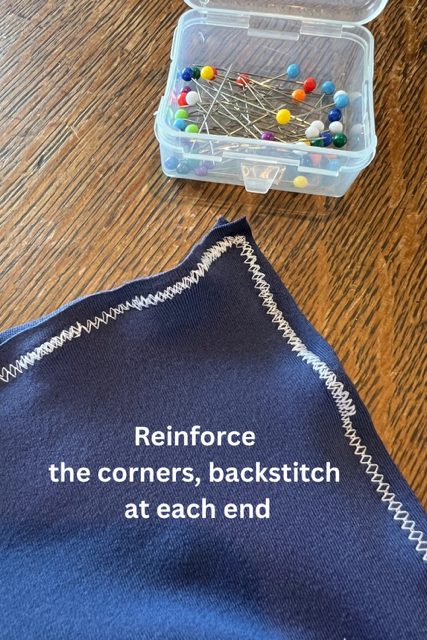
- Sew 3 sides of the body sock, leaving a ¼ inch seam allowance using the zigzag stitch (my stitch length is 1.5; stitch width 3.0), leaving one short side open. Make sure to gently guide the fabric through, do not pull. Secure seams by backstitching. Sew the corners using 90-degree turns; do not curve your corners. The open short side will be used for the opening for the head. We will close the shoulders later.
- Make sure both layers of fabric are sewn in place on both sides. If needed, resew those areas, making sure to backstitch.
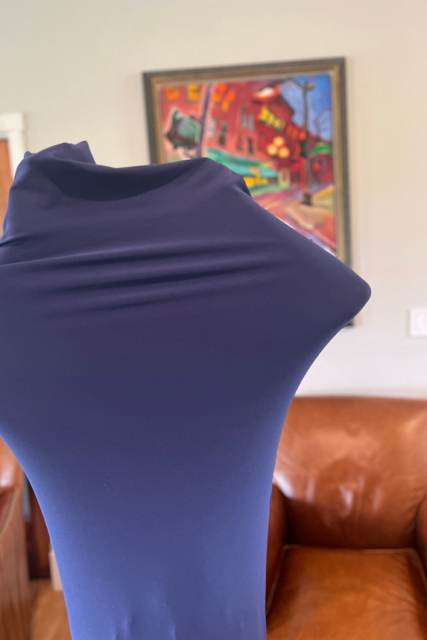
- Next, turn the body sock right side out through the opening. Push the corners out. Have your child try on the body sock, and make sure it's a good fit.
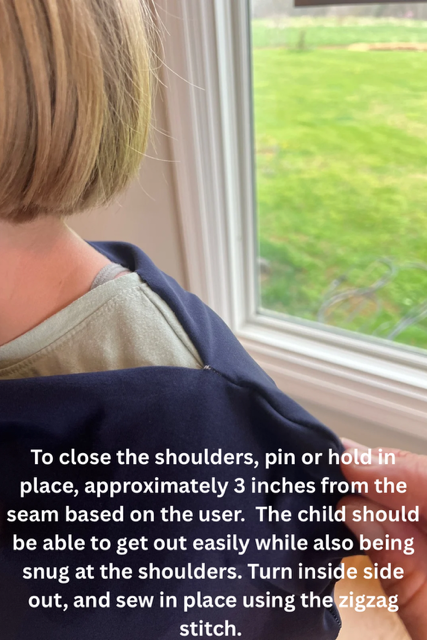
- Next, to close the shoulders, carefully pin or hold in place. I held the fabric around the shoulders in place, 3 inches in from the corner seam. This allowed the child to get in and out with ease while also providing deep pressure around the shoulders. Make adjustments based on your child’s size. Carefully remove the body sock, maintaining hold or pins indicating where to sew. Pin the shoulders in place if needed.
- Lastly, turn the body sock back inside out before sewing the shoulders, and close the shoulder area by sewing in place, making sure to backstitch.
- Next, reinforce any high-stress areas, such as the corners continuing to use the zigzag stitch. Trim any loose ends using scissors.
- Turn right sides out, try on again. The body sock should hold in place around the shoulders while the child can still easily get the body sock on and off.
- Done! Inspect the seams regularly in case you need to restitch over certain areas. Enjoy!
Resources
Occupational Therapy Resources
- John McGivney Children’s Centre’s Occupational Therapy Tip Sheet: Body Sock
- Curriculum For Autism: How To Make A Simple DIY Body Sock For A Child Or Teen With Autism
- Active Play Therapies’ DIY Body Sock
Sewing Resources
Author Bio
Kerry is a pediatric occupational therapist who loves creating occupational therapy tools to help improve accessibility and independence for individuals across the lifespan. The DIY Therapist blog is a creative space for all things do-it-yourself OT. On the blog, you will find step-by-step tutorials for school-based and sensory tools, assistive technology, fine motor projects as well as adaptive clothing.
Kerry lives with her family in Tennessee, where you will often find her in the garden picking tomatoes or wading through the creek with her kids trying to find little nature treasures. You can find more pediatric resources and project tutorials at The DIY Therapist and find her on Pinterest.

DIY Sensory Body Sock Tutorial [Print Version]
Equipment
- Lycra brand fabric or a mixture spandex along with nylon or polyester see section above regarding the fabric needed, approximately 2 yards depending on the height of the user.
- 100% polyester thread
- Stretch or ballpoint sewing machine needle
- Sewing machine with a zigzag stitch
- Scissors
- Rotary cutter and mat (or scissors)
- Measuring tape
- Straight pins
Instructions
Measure
- First, measure the child from head to toe. Fold the fabric in half lengthwise for the front and back of the sock. Cut the length of your fabric based on the head to toe measurement either using scissors or a rotary cutter and mat.
- Next, measure the width of the child from shoulder to shoulder and add 5 inches to the width. Cut the width of the fabric to size, making sure to cut and discard the fold (or keep for another project).
Test Your Settings and Material Before Starting
- Before starting the next step, begin by sewing two scrap pieces of the spandex material together. To do this use a ballpoint or stretch needle, 100% polyester thread, and the zigzag stitch (my stitch length is 1.5; stitch width 3.0). Once done, stretch the sewn scrap fabric pieces apart in multiple directions, and inspect. Make adjustments and test again if needed, and when ready begin the project.
Begin The Body Sock
- Next, determine which side will be on the outside versus the inside of the fabric. With the right sides together, pin in place.
- Sew 3 sides of the body sock leaving a ¼ inch seam allowance using the zigzag stitch (my stitch length is 1.5; stitch width 3.0), leaving one short side open. Make sure to gently guide the fabric through, do not pull. Secure seams by backstitching. Sew the corners using 90 degree turns, do not curve your corners. The open short side will be used for the opening for the head. We will close the shoulders later.
- Make sure both layers of fabric are sewn in place on both sides. If needed, resew those areas making sure to backstitch.
- Next, turn the body sock right sides out through the opening. Push the corners out. Have your child try on the body sock, and make sure it's a good fit.
- Next, to close the shoulders, carefully pin or hold in place. I held the fabric around the shoulders in place, 3 inches in from the corner seam. This allowed the child to get in and out with ease while also providing deep pressure around the shoulders. Make adjustments based on your child’s size. Carefully remove body sock, maintaining hold or pins indicating where to sew. Pin the shoulders in place if needed.
- Lastly, turn the body sock back inside out before sewing the shoulders, and close the shoulder area by sewing in place making sure to backstitch.
- Next, reinforce any high stress areas such as the corners continuing to use the zigzag stitch. Trim any loose ends using scissors.
- Turn right sides out, try on again. The body sock should hold in place around the shoulders while the child can still easily get the body sock on and off.
- Done! Inspect the seams regularly in case you need to restitch over certain areas.
Notes

Heather Greutman, COTA
Heather Greutman is a Certified Occupational Therapy Assistant with experience in school-based OT services for preschool through high school. She uses her background to share child development tips, tools, and strategies for parents, educators, and therapists. She is the author of many ebooks including The Basics of Fine Motor Skills, and Basics of Pre-Writing Skills, and co-author of Sensory Processing Explained: A Handbook for Parents and Educators.