DIY Sensory Body Sock Tutorial [Print Version]
Equipment
- Lycra brand fabric or a mixture spandex along with nylon or polyester see section above regarding the fabric needed, approximately 2 yards depending on the height of the user.
- 100% polyester thread
- Stretch or ballpoint sewing machine needle
- Sewing machine with a zigzag stitch
- Scissors
- Rotary cutter and mat (or scissors)
- Measuring tape
- Straight pins
Instructions
Measure
- First, measure the child from head to toe. Fold the fabric in half lengthwise for the front and back of the sock. Cut the length of your fabric based on the head to toe measurement either using scissors or a rotary cutter and mat.
- Next, measure the width of the child from shoulder to shoulder and add 5 inches to the width. Cut the width of the fabric to size, making sure to cut and discard the fold (or keep for another project).
Test Your Settings and Material Before Starting
- Before starting the next step, begin by sewing two scrap pieces of the spandex material together. To do this use a ballpoint or stretch needle, 100% polyester thread, and the zigzag stitch (my stitch length is 1.5; stitch width 3.0). Once done, stretch the sewn scrap fabric pieces apart in multiple directions, and inspect. Make adjustments and test again if needed, and when ready begin the project.
Begin The Body Sock
- Next, determine which side will be on the outside versus the inside of the fabric. With the right sides together, pin in place.
- Sew 3 sides of the body sock leaving a ¼ inch seam allowance using the zigzag stitch (my stitch length is 1.5; stitch width 3.0), leaving one short side open. Make sure to gently guide the fabric through, do not pull. Secure seams by backstitching. Sew the corners using 90 degree turns, do not curve your corners. The open short side will be used for the opening for the head. We will close the shoulders later.
- Make sure both layers of fabric are sewn in place on both sides. If needed, resew those areas making sure to backstitch.
- Next, turn the body sock right sides out through the opening. Push the corners out. Have your child try on the body sock, and make sure it's a good fit.
- Next, to close the shoulders, carefully pin or hold in place. I held the fabric around the shoulders in place, 3 inches in from the corner seam. This allowed the child to get in and out with ease while also providing deep pressure around the shoulders. Make adjustments based on your child’s size. Carefully remove body sock, maintaining hold or pins indicating where to sew. Pin the shoulders in place if needed.
- Lastly, turn the body sock back inside out before sewing the shoulders, and close the shoulder area by sewing in place making sure to backstitch.
- Next, reinforce any high stress areas such as the corners continuing to use the zigzag stitch. Trim any loose ends using scissors.
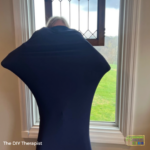
- Turn right sides out, try on again. The body sock should hold in place around the shoulders while the child can still easily get the body sock on and off.
- Done! Inspect the seams regularly in case you need to restitch over certain areas.
Notes
How Should The Body Sock Fit?
The snug fit of the body sock provides the user with the calming effects of deep pressure. It should not be loose, but instead provide the child a snug bear hug. Therefore, the sock should not cause any pressure points or make the child feel uncomfortable due to the amount of pressure.
Safety Using The Body Sock
When using the sensory sock at home, school, or at a pediatric therapy center, consider designating a defined space. This will help avoid bumping into objects and prevent falls. Such spaces can be a large rug, mat, clutter free playroom, or even the bed for when lying down. Above all, avoid using the sensory body sock on slick floors such as hardwood floors or linoleum. The head should remain outside the body sock unless lying down on a bed or other stable surface to prevent falls. Adult supervision is required.